

Arduino Single-Sided Serial Board (version 3) - DIY Arduino UNO
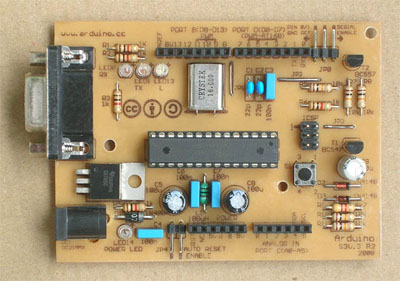
If you don't have an easy way to order an Arduino board or kit, you can etch this PCB design by hand and solder it together. It is pin-compatible with the Arduino Diecimila, and should work with any Arduino shield.
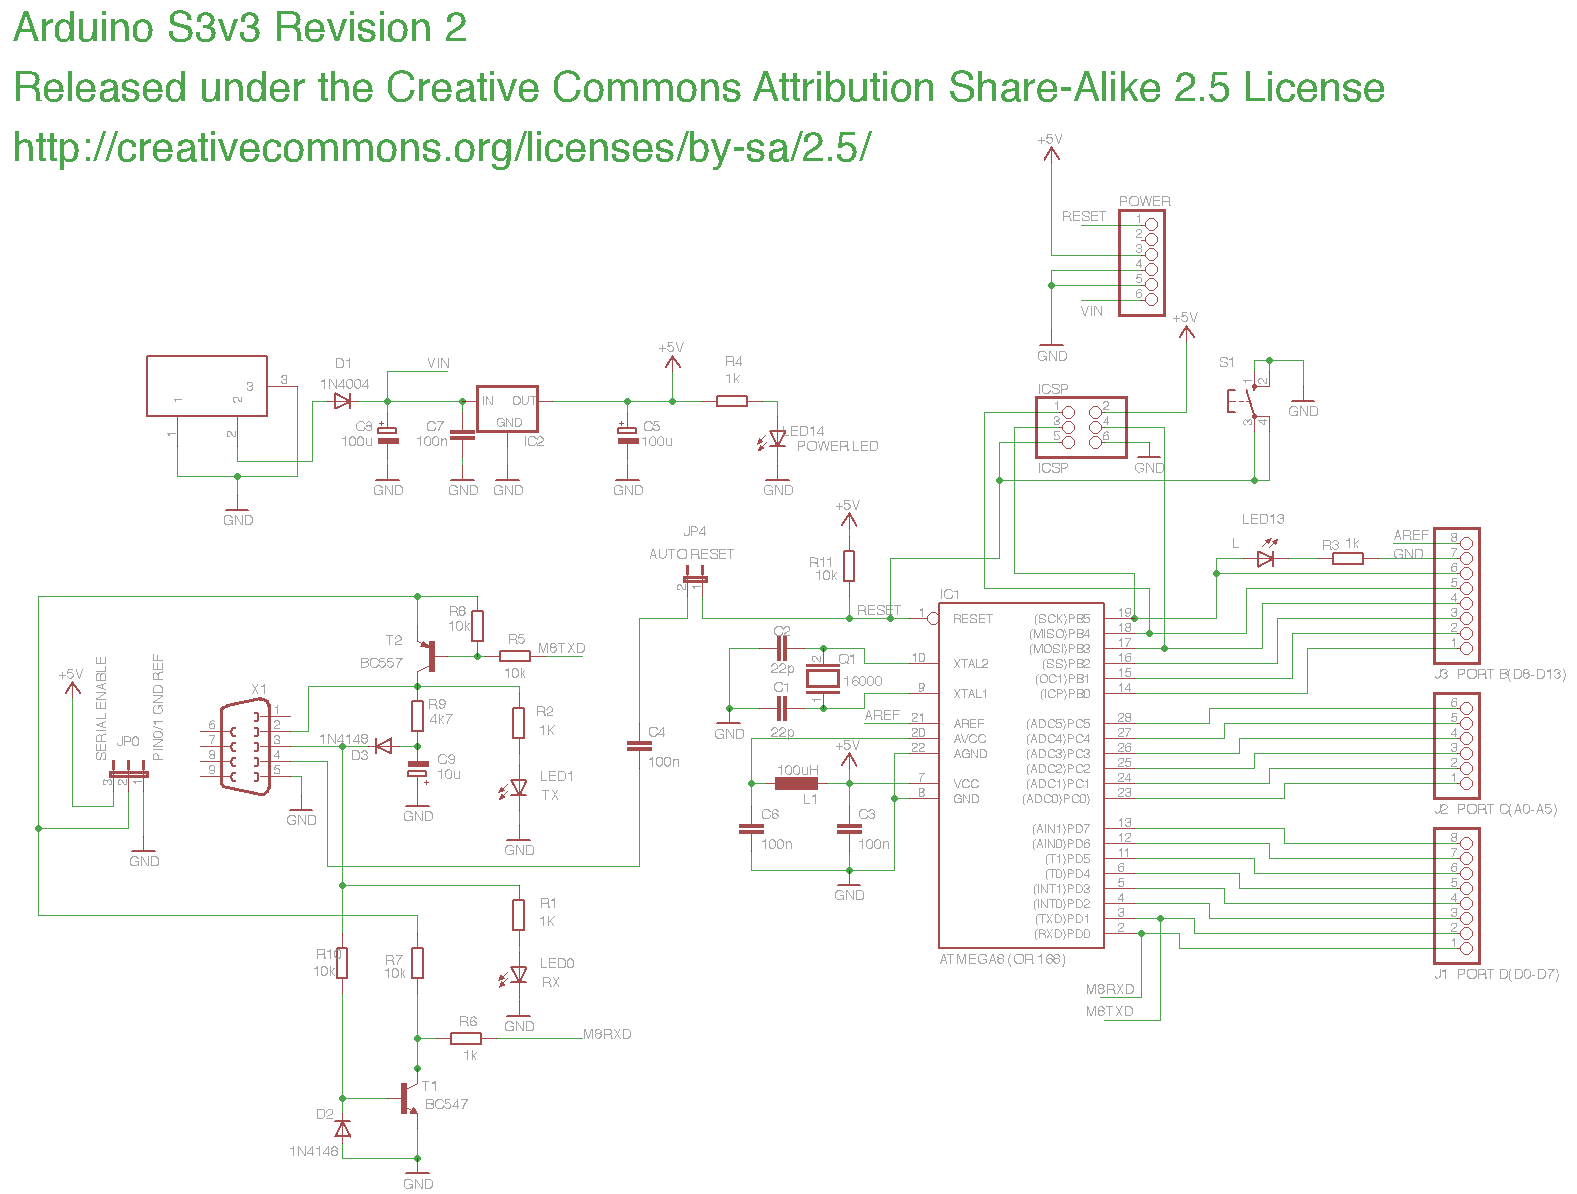
This is the third revision of the board: the Arduino Single-Sided Serial version 3, or s3v3, or Arduino Severino. It was designed by Adilson Akashi, based on the previous version.
These files are licensed under the Creative Commons Attribution Share-Alike 2.5 license.
Assembly Guide:
Arduino is the best open source embedded platfrom, the coding is so so damn simple and everyone can make amazing project with this gadget.
i looked for prices and product online i fould i can get one for 10 to 15 $
then i thought of making one...and i made it for 3 $...
that is how easy it is...so dont buy an arduino!! make one...
i looked for prices and product online i fould i can get one for 10 to 15 $
then i thought of making one...and i made it for 3 $...
that is how easy it is...so dont buy an arduino!! make one...
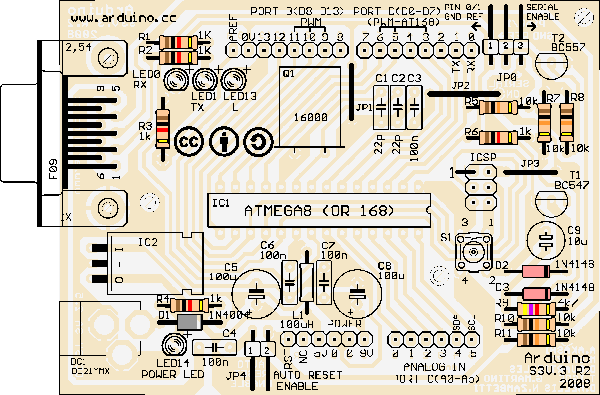
Step 1: Components
You need to get all these components before you start
ceramic disc capacitor 22pF (22 pico Farad) (quantity-2)
ceramic or polyester capacitor 100nF (100 nano Farad - or 0.1 micro
Farad) (quantity-4)
electrolytic capacitor 100µF (100 micro Farad) (quantity-2)
non-polarized electrolytic
capacitor
10µF (10 micro Farad)
diode 1N4004
diode 1N4148 (quantity-2)
2.1mm. DC power jack
ATMEGA8 (or ATMEGA168)
Tension Regulator 7805C
male pin header 2x3
female pin header 1x8 (quantity-2)
female pin header 1x6 (quantity-2)
right angle pin header 1x3
right angle pin header 1x2
leaded inductor 100µH (100 micro Henry)
LED 3 mm. (quantity-4)
16 MHz crystal
Resistor 1kohm (1.0 kilo ohms) (quantity-5)
Resistor 4k7ohms (4.7 kilo ohms) (quantity-1)
Resistor 10kohms (10.0 kilo ohms) (quantity-5)
Switch Tactile 6x6 mm., 4 terminals
Transistor BC547
Transistor BC557
D-SUB CONNECTOR 9 PIN FEMALE RIGHT ANGLE PC
MOUNT
jumper for 0.1" header (quantity-2)
if you are planing to etch your own PCB then you will need your copper board, a laser printer and drill bits and bla bla bla..you can check out this
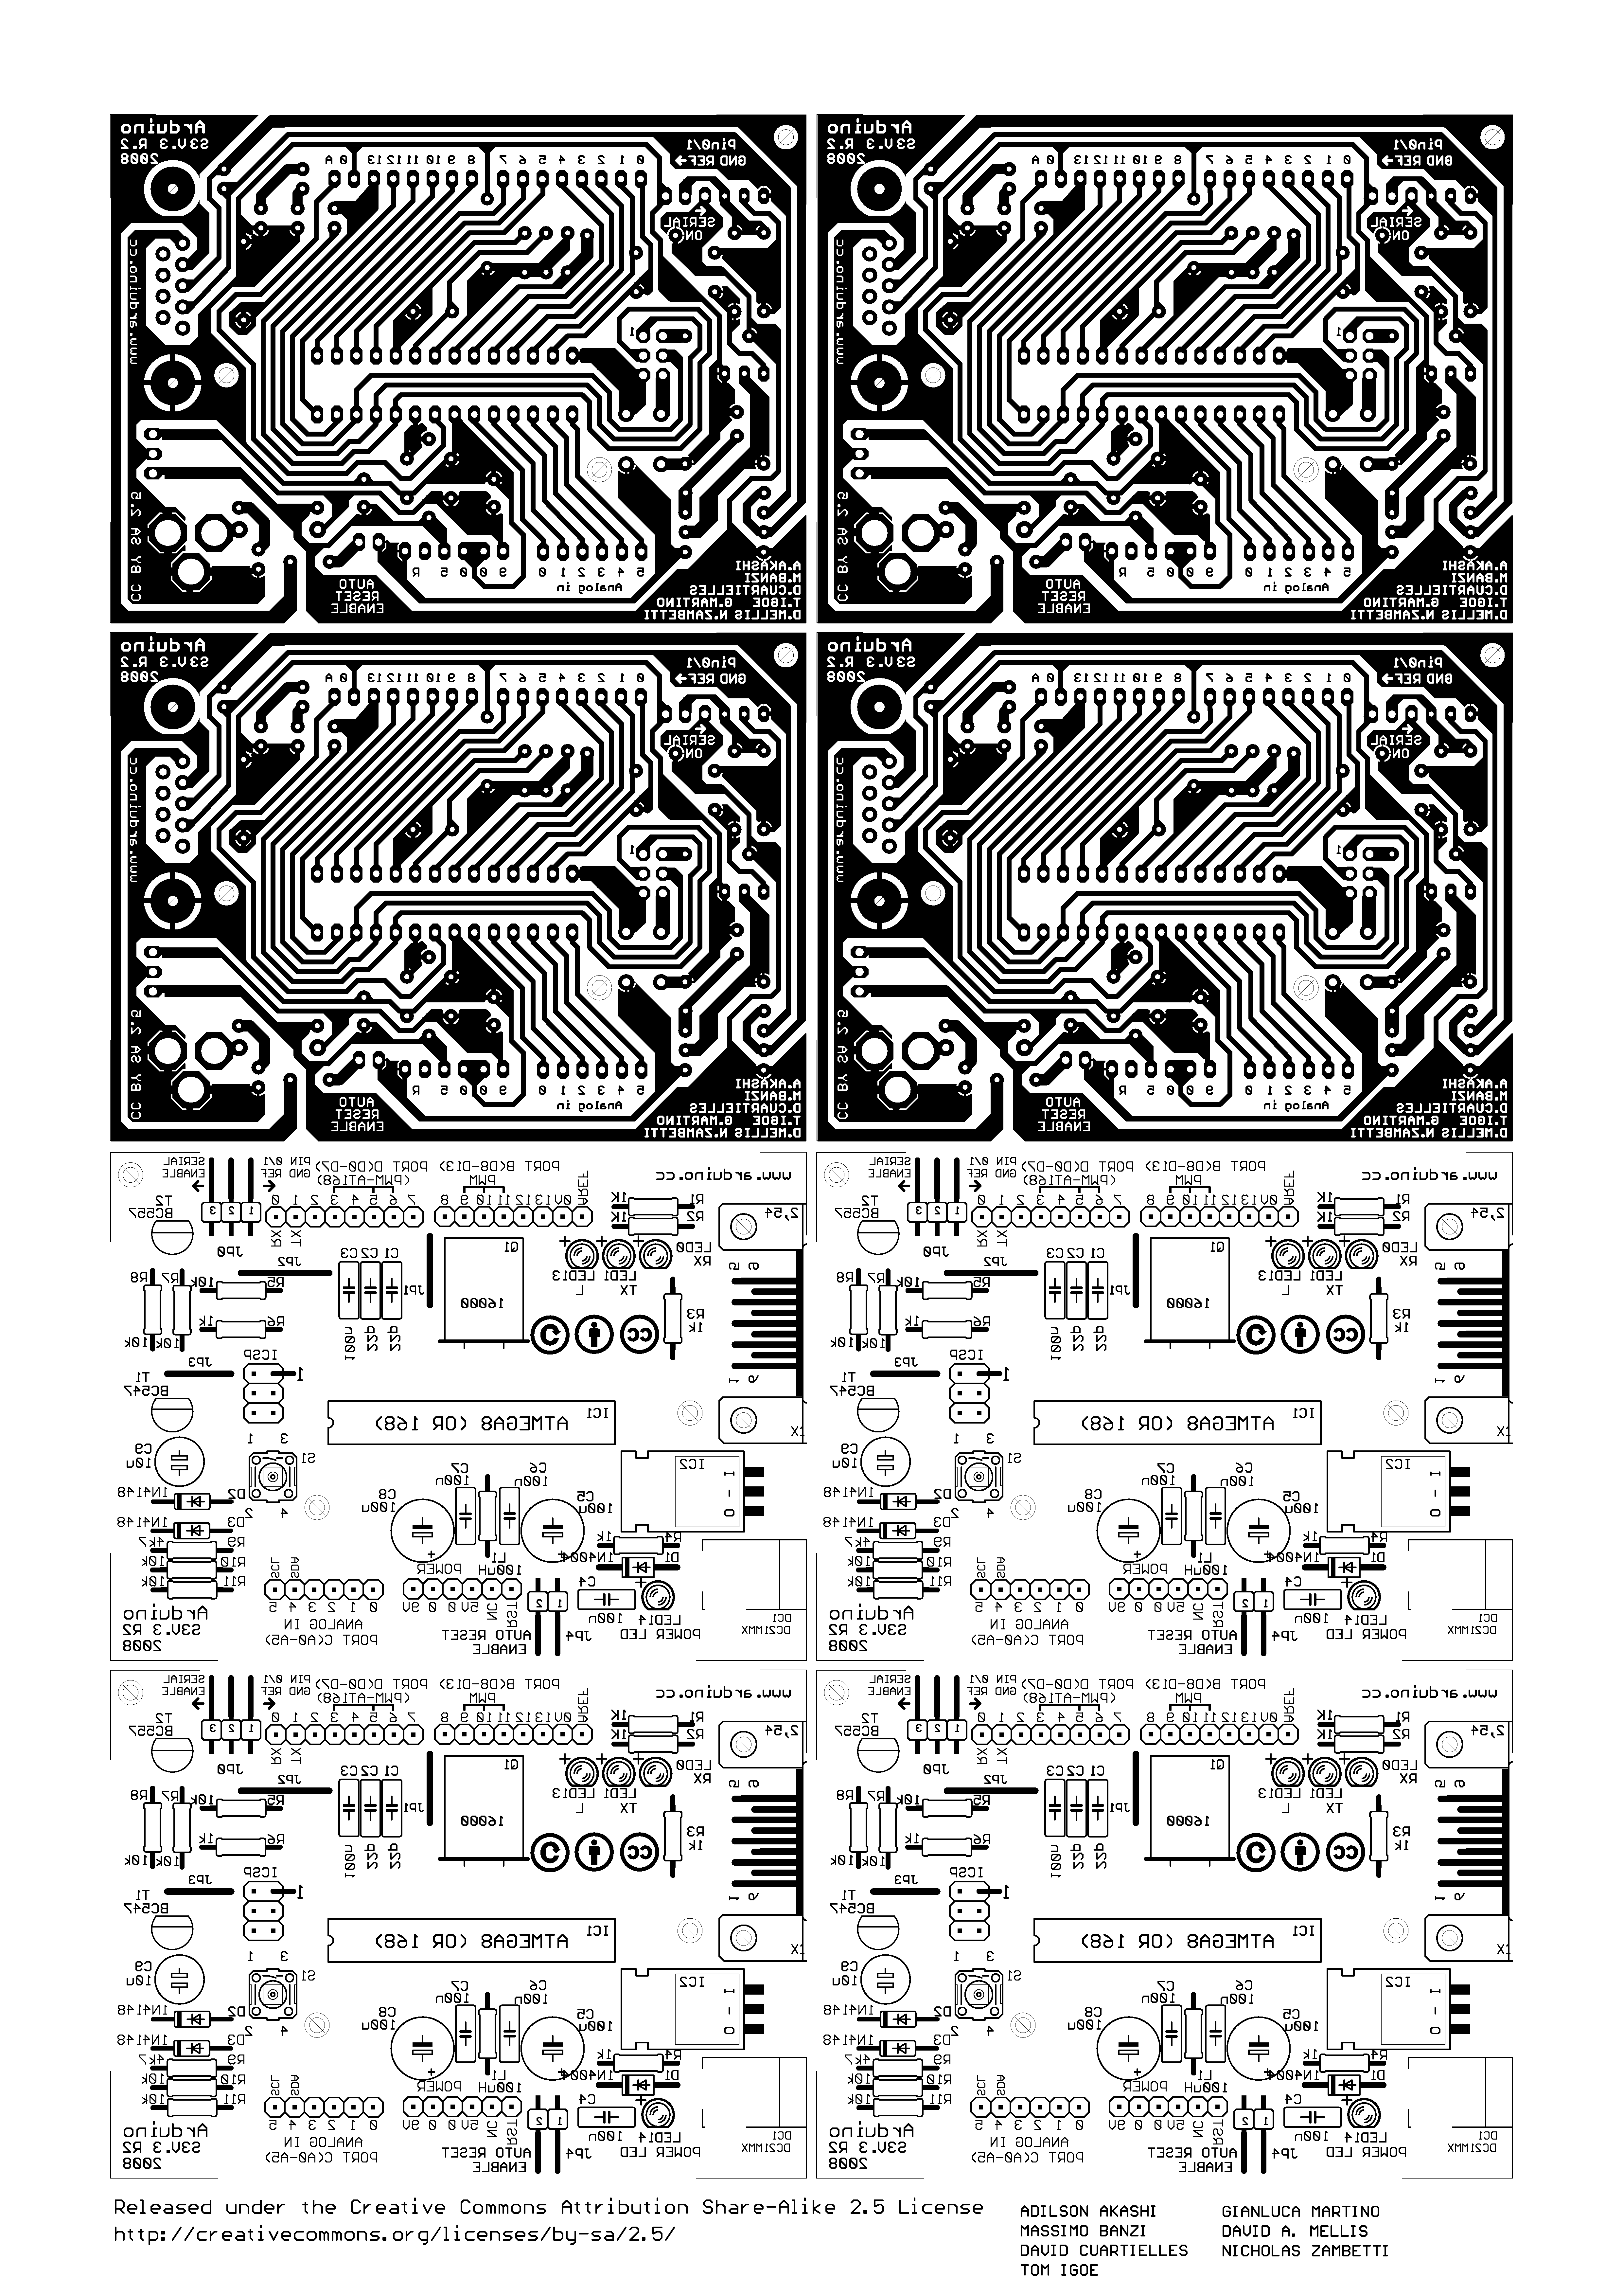
Step 2: Making the Board


you can downalod the PDF(Arduino_S3v3_R2_A4_4x2.pdf) for the tonner transfer from below. while you print dont forget to select "actual size option". for the single side PCB option.
i have also attached the Eagle files for double side board!(release_arduino_rs232_v2)
once the board is etched drill the holes and you are ready to start.
i have also attached the Eagle files for double side board!(release_arduino_rs232_v2)
once the board is etched drill the holes and you are ready to start.

Step 4: Programing the ATmega8 Or(168)

both atmega 8 and 168 work well for the Arduino..but its better to use a 168..as there are some Verification errors are show in atmega 8.
And now connect you programmer...
connect ur MOSI , MISO, SCK ,RESET and GND as shown in the fig.
i have used a USBasp for programing if u want to make ur own USBasp visit here
if u are using MKII or any other programer just change the -c option in avrdude.
For ATMEGA8
Avrdude –p m8 –c usbasp -e
i have ziped the hex file download it
Unlock the bootloader
avrdude -p atmega8 –c usbasp -U lock:w:0xff:m
(fails with avrdude: verification error, first mismatch at byte 0×0000 0xff != 0×3f)
Program the fuses
avrdude -p m8 –c usbasp -U hfuse:w:0xca:m -U lfuse:w:0xdf:m
Burn the bootloader (TEST: try with -D disable auto erase) can find this in the .zip file or
avrdude -p m8 -c usbasp -U flash:w:ATmegaBOOT.hex
Lock the bootloader
avrdude -p m8 -c usbasp -U lock:w:0xcf:m
(fails with avrdude: verification error, first mismatch at byte 0×0000 0xcf != 0×0f)
For ATMEGA168
Avrdude –p m8 –c usbasp -e
Unlock the bootloader
avrdude -p atmega168 –c usbasp -U lock:w:0×3f:m
Program the fuses
avrdude -p atmega168 –c usbasp -U hfuse:w:0xdd:m -U lfuse:w:0xff:m -U efuse:w:0×00:m
Burn the bootloader
avrdude -p atmega168 –c usbasp -U flash:w:ATmegaBOOT_168_ng.hex
Lock the bootloader
avrdude -p atmega168 –c usbasp -U lock:w:0×0f:m
...now you are ready to go...
Just don’t for get to put the jumper in JP0 in2-3 position...

Step 5: Connecting to the PC


![IMG_8142[1].JPG](https://cdn.instructables.com/FUN/7YRT/G8B8VUK9/FUN7YRTG8B8VUK9.SMALL.jpg?width=265.40537605213143)
You have to first download the IDE from the Arduino.cc website.
connect your Arduino to a 5v DC power supply and the serial port to COM1 of ur pc or u can use a USB to serial converter.
u can see a red light blinking! it means you are good to go!!
you can check in device manager for the com number..if u are using a virtual COM(usb to serial).
then
go to “boards>arduino NG or older w/ ATmega8”...
Step 6: Hello World!


now to burn the first program to your arduino!
go to file>examples>stubs>hello world
click on the PLAY button to complie once the compile is complete press upload! to burn the program.
dont forget the jumper i have mentioned in step 4...if u get a sync error..either u missed the jumper or the circuit is wrong!!
once the upload is done! open the serial motor to check the output! Voila....arduino serverino...go to Arduino.cc for more fun stuff to do with Arduino!!
if u want to use the chip as a barebones arduino i have attached the pin maping on atmega8
all necessary files can be found in Arduino_Mycrobonics.zip !! hav fun...

Tags:
arduino severino bootloader,arduino severino tutorial,arduino
severino atmega328 bootloader,arduino severino atmega8,arduino severino
pcb,arduino severino programming,arduino severino ide,arduino severino
driver,arduino severino project,arduino severino max232,arduino
severino,arduino severino schematic,arduino severino atmega8 bootloader,arduino
severino adalah,arduino severino con atmega328,arduino severino
atmega168,arduino severino board,severino arduino brasileiro,arduino severino
lista de components,arduino severino esquema,esquematico arduino severino,harga
arduino severino,arduino severino not in sync,jual arduino severino,kit arduino
severino,arduino severino manual,membuat arduino severino,o que é arduino
severino,arduino s3v3 r2,arduino s3v3 revision 2,arduino s3v3,arduino s3v3
severino,arduino,uno,severino,s3v3,single,sided,pcb,homemade,cheap,arduino s3v3
r2,arduino s3v3 revision 2,arduino s3v3,arduino severino bootloader,arduino
severino tutorial,arduino severino atmega328,atmega8,arduino severino
bootloader,arduino severino tutorial,arduino severino atmega328
bootloader,arduino severino atmega8,arduino severino pcb,arduino severino programming,arduino
severino ide,arduino severino driver,arduino severino project,arduino severino
max232,arduino severino,arduino severino schematic,arduino severino atmega8
bootloader,arduino severino adalah,arduino severino con atmega328,arduino
severino atmega168,arduino severino board,severino arduino brasileiro,arduino
severino lista de components,arduino severino esquema,esquematico arduino
severino,harga arduino severino,arduino severino not in sync,jual arduino
severino,kit arduino severino,arduino severino manual,membuat arduino
severino,o que é arduino severino,arduino s3v3 r2,arduino s3v3 revision
2,arduino s3v3,arduino s3v3
severino, arduino,uno,severino,s3v3,single,sided,pcb,homemade,cheap,arduino
s3v3 r2,arduino s3v3 revision 2,arduino s3v3,arduino severino
bootloader,arduino severino tutorial,arduino severino atmega328,atmega8,
UM techonologies Pvt. Ltd., UM techonologies Pvt Ltd, UM
Tech, um tech
UM techonologies Pvt. Ltd., UM techonologies Pvt Ltd, UM
Tech, um tech
UM techonologies Pvt. Ltd., UM techonologies Pvt Ltd, UM
Tech, um tech
UM techonologies Pvt. Ltd., UM techonologies Pvt Ltd, UM
Tech, um tech
UM techonologies Pvt. Ltd., UM techonologies Pvt Ltd, UM
Tech, um tech
arduino severino bootloader,arduino severino tutorial,arduino
severino atmega328 bootloader,arduino severino atmega8,arduino severino
pcb,arduino severino programming,arduino severino ide,arduino severino
driver,arduino severino project,arduino severino max232,arduino
severino,arduino severino schematic,arduino severino atmega8 bootloader,arduino
severino adalah,arduino severino con atmega328,arduino severino
atmega168,arduino severino board,severino arduino brasileiro,arduino severino
lista de components,arduino severino esquema,esquematico arduino severino,harga
arduino severino,arduino severino not in sync,jual arduino severino,kit arduino
severino,arduino severino manual,membuat arduino severino,o que é arduino
severino,arduino s3v3 r2,arduino s3v3 revision 2,arduino s3v3,arduino s3v3
severino,arduino,uno,severino,s3v3,single,sided,pcb,homemade,cheap,arduino s3v3
r2,arduino s3v3 revision 2,arduino s3v3,arduino severino bootloader,arduino
severino tutorial,arduino severino atmega328,atmega8,arduino severino
bootloader,arduino severino tutorial,arduino severino atmega328 bootloader,arduino
severino atmega8,arduino severino pcb,arduino severino programming,arduino
severino ide,arduino severino driver,arduino severino project,arduino severino
max232,arduino severino,arduino severino schematic,arduino severino atmega8
bootloader,arduino severino adalah,arduino severino con atmega328,arduino
severino atmega168,arduino severino board,severino arduino brasileiro,arduino
severino lista de components,arduino severino esquema,esquematico arduino
severino,harga arduino severino,arduino severino not in sync,jual arduino
severino,kit arduino severino,arduino severino manual,membuat arduino
severino,o que é arduino severino,arduino s3v3 r2,arduino s3v3 revision
2,arduino s3v3,arduino s3v3
severino, arduino,uno,severino,s3v3,single,sided,pcb,homemade,cheap,arduino
s3v3 r2,arduino s3v3 revision 2,arduino s3v3,arduino severino
bootloader,arduino severino tutorial,arduino severino atmega328,atmega8, Arduino Single-Sided Serial Board (version 3) - DIY Arduino UNO,
UM techonologies Pvt. Ltd., UM techonologies Pvt Ltd, UM
Tech, um tech
UM techonologies Pvt. Ltd., UM techonologies Pvt Ltd, UM
Tech, um tech
UM techonologies Pvt. Ltd., UM techonologies Pvt Ltd, UM
Tech, um tech
UM techonologies Pvt. Ltd., UM techonologies Pvt Ltd, UM
Tech, um tech
UM techonologies Pvt. Ltd., UM techonologies Pvt Ltd, UM
Tech, um tech

Post a Comment