

Get started with Asus Tinker Board S and Node.js
Introduction
In this guide we will build a simple Node.js web server project on a Asus Tinker Board S. At its most basic, the process for deploying code to a Asus Tinker Board S consists of two major steps:
- Setting up your Asus Tinker Board S with balenaOS, the host OS that manages communication with balena and runs the core device operations.
- Pushing your Node.js project to the balena image builder, which pulls in all necessary dependencies and creates the container image for your application.
Once these steps are finished, your Asus Tinker Board S will download the container image, kick off your application, and begin sending logs to your balena dashboard!
What you will need

- An Asus Tinker Board S. See our supported devices list for other boards.
- A micro SD card.
- A micro USB cable to power the device.
- [Optional] An ethernet cable.
- A balena account.
Need help?
If you find yourself stuck or confused, help is just a click away:
- The balenaCloud section of the forums is where our engineers address any issues you may be having with balena.
- You can read more about our approach to support here.
Account setup
If you don't already have a balena account, make sure to sign up.
Adding an SSH Key
Balena uses git to push code from your computer to a dedicated repository. As part of the account creation process, you will be asked to add a public SSH key. The SSH key secures your connection to our server, letting us know you have the authority to make changes to the repository.
Note: You can click Skip to move past this step for now, but you will not be able to push code to your Asus Tinker Board Suntil you have added a public key to your account. This can be done at any time from the Preferences page on the dashboard.
If you have a public SSH key, simply paste it into the box provided and click Save Key:

You can also import your key from GitHub. If you choose this option, you will be asked to enter your GitHub username:

Don't have an SSH key?
If you are unfamiliar with SSH keys, we recommend you take a look at GitHub's excellent documentation. This will walk you through everything you need to create a key pair. Window's user? Be sure to check out these instructions.
Create an application
An application is a group of devices that share the same architecture and run the same code. When you provision a device, it is added to a specific application, but can be migrated to another application at any time.
To create an application, select the Asus Tinker Board S device type, select an application type, enter a name, and click Create new application:

Note: To create an application with multiple containers, you'll want to use the starter or microservices application type. The starter applications are full-featured and free for all users, with a limit of up to ten total devices across all starter applications.
This will take you to the dashboard for your newly created application, where you can manage your whole fleet of Asus Tinker Board Ss.
Add your first device
To connect with balena, your Asus Tinker Board S will need a balenaOS image that is configured for your device type, application, and network. Start by clicking Add device in your application dashboard:

For most applications, you will have the option to select a device type. By default, the device type you chose when you first created the application will be selected. Applications can, however, support any devices that share the same architecture, so you can choose another device type if needed.
After selecting a device type, you will see a list of available balenaOS versions. In general, the most recent version is recommended. You can also select whether you would prefer a Development or Production edition with the respective toggle:

Note: When you're first getting started, a Development image will be most useful, as it permits a number of testing and troubleshooting features. For production use, be sure to switch to a Production image. More details on the differences between Development and Production images can be found here.
A toggle is also used to select whether your network connection will be through Ethernet Only or with the option for WiFi + Ethernet. Selecting Wifi + Ethernet allows you to enter a WiFi SSID and WiFi Passphrase:

Clicking Advanced presents the option to select the rate at which your device checks for updates and the option to download just a configuration file (
config.json) rather than an entire image: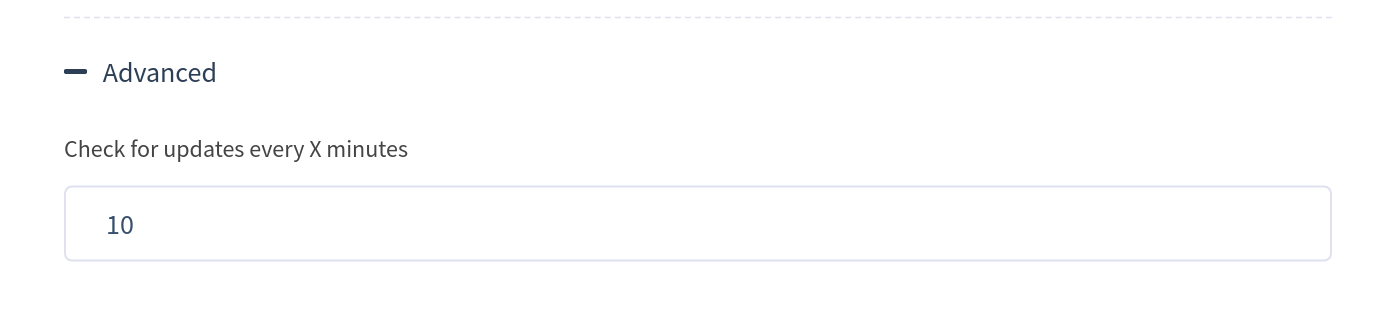
Once you have finished your image configuration, click the Download balenaOS button. When the download completes, you should have a zipped image file with a name like
balena-FirstApp-2.3.0+rev1-dev-v6.1.3.img.zip, where FirstApp is the name you gave your application on the dashboard.
The next step is to flash the downloaded image onto your eMMC using Etcher, a simple, cross platform eMMC writer and validator. Once you have Etcher installed, start it up. To give Etcher access to your eMMC, your system may prompt you to grant administrative privileges.
To create a bootable balenaOS eMMC follow these steps:
- Click Select image and find your application's balenaOS image file.
- If you haven't already done so, insert your eMMC into your computer. Etcher will automatically detect it. If you have more than one eMMC inserted, you will need to select the appropriate one.
- Click the Flash! button.
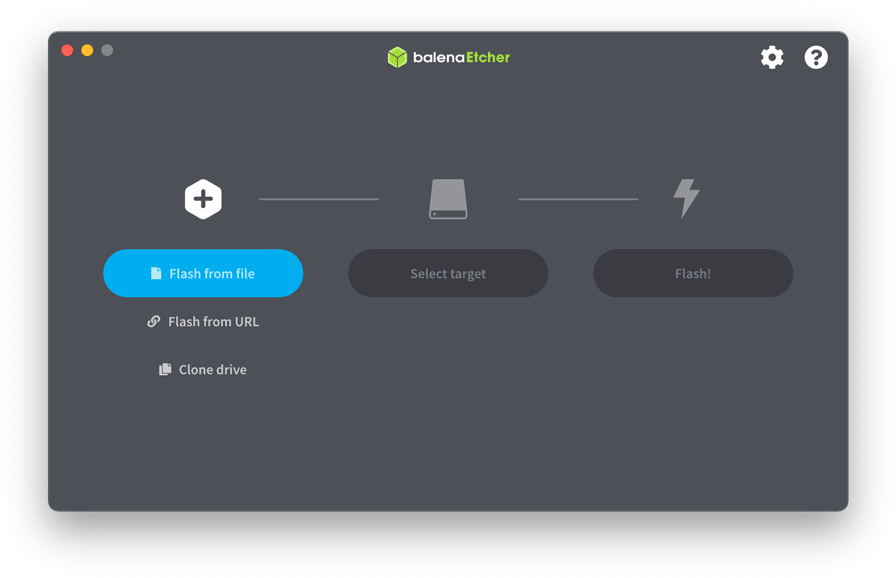
Etcher will now prepare a bootable eMMC and validate that it was flashed correctly. This can take roughly 3 or more minutes depending on the quality of your eMMC. You'll get a little ping when it's done, and Etcher will safely eject the eMMC for you.
Note: You can burn several eMMCs with the same image file and all the devices will boot and provision into your application's fleet. You can also disable the auto-ejecting or validation steps from the Etcher settings panel.
Provision your device
Insert the SD card into your Asus Tinker Board S and connect the ethernet cable if necessary. Before powering up the Asus Tinker Board S, make sure that the jumper between the 5V power supply and the HDMI connector is in the
MASKROM mode, as illustrated at this link https://tinkerboarding.co.uk/wiki/index.php/Setup. Now power up the Asus Tinker Board S by inserting the micro USB cable.
It will take a minute or so for the Asus Tinker Board S to appear on your balena dashboard. While you wait, balenaOS is establishing a secure connection with the balena servers and flashing the OS onto the device's internal eMMC. It then expands the partitions to use all the available space.
Once the OS is fully flashed onto the devices eMMC, the device will perform a shutdown and all the LEDs on the device will turn off. Now make sure that the jumper between the 5V power supply and the HDMI connector is in the "parking (no function)" mode.
You can now power the board back up and you should see it's status indicate "online" and you should now be ready to deploy some code!
Note: Class 4 SD cards can take up to 3 times longer so it's well worth investing in the fastest card you can find.
Help! My device won't show up.
If your device still hasn't shown up on your dashboard after a few minutes, something is definitely wrong. First check that you entered the WiFi credentials correctly and ensure that your network meets these basic requirements. It may also be worth checking the LED error notifications
If you still can't get your device online, come on over and talk to us on our support channel.
Deploy code
Now that we have a device or two connected to a balena application, let's deploy some code and actually start building something.
A nice first project to get your feet wet is a simple Express.js web server which will serve a static page on port
:80. All the project source code can be found [here on github] simple-server-node-link.
To clone the project, run the following command in a terminal or your preferred git client:
$ git clone https://github.com/balena-io-projects/simple-server-node.git
Note: This project runs an application in a single container. If you would like to start with a multicontainer project, run
git clone git@github.com:balena-io-projects/multicontainer-getting-started.git.
Once the repo is cloned, change directory into the newly created
simple-server-node directory and add the balena git remote endpoint by running the command git remote add shown in the top-right corner of your application page:$ cd simple-server-node
$ git remote add balena <USERNAME>@git.balena-cloud.com:<USERNAME>/<APPNAME>.git
Note: On other git clients there may be an alternative way to add a remote repository.
So now we have set up a reference in our local git repository (the one on our development computer) to the balena application remote repository. So when we push new changes to this remote repository it will get compiled and built on our servers and deployed to every device in the application fleet.
Warning: The balena git repository is not intended as a code hosting solution, and we cannot guarantee the persistence of data in balena git remotes.
Now to deploy this code to all device(s) in the application just run the command:
$ git push balena master
If you want to completely replace the source code of the application with a new source tree, you may need to force the push by running
git push balena master --force, due to how git works.
Note: On your very first push, git may ask you if you would like to add this host to your list of allowed hosts. If the ECDSA key fingerprint matches
SHA256:NfwmqnKId5cx1RWpebbEuuM87bCJbdyhzRnqFES9Nnw, you are pushing to the right place. Type 'yes' to continue.
You'll know your code has been successfully compiled and built when our friendly unicorn mascot appears in your terminal:

This means your code is safely built and stored on our image registry. It should only take about 2 minutes to build your code and subsequent builds will be quicker because of build caching.
Your application will now be downloaded and executed by all the devices you have connected in your application fleet. You may have to wait about 6 minutes for the first push... So time for more tea, but don't worry, all subsequent pushes are much, much faster due to Docker layer sharing. You can see the progress of the device code updates on the device dashboard:

You should now have a node.js web server running on your device and see some logs on your dashboard. If you go to the
/cdn.vox-cdn.com/uploads/chorus_image/image/52890535/tinker_board_asus.0.jpg)
Actions page for your device, you can enable a public URL, this URL is accessible from anywhere in the world.
If you follow the URL, you will be served a page with some additional balena learning resources and next steps. Alternatively, you can point your browser to your device's IP address.
asus tinker board, single board computer, node.js, getting started, Get started with Asus Tinker Board, asus tinker board specs, asus tinker board review,

Post a Comment